How to Create Pinterest Pins for Your Blog (2026 Guide)
You can write a great blog post and still have almost no one see it.
That’s one of the frustrating parts of content marketing.
You spend hours researching a topic, writing the article, adding images, and publishing it. Then the post sits on your website waiting for visitors.
Pinterest can give that content another way to be discovered.
Unlike a typical social post that disappears quickly in a feed, a Pinterest Pin can send people directly to your blog and help your content get discovered through both visual and keyword-based search. Pinterest itself describes the platform as a place where people search for ideas, and its business guidance recommends using relevant keywords in Pin titles and descriptions while completing the available Pin fields.
The good news is that you don’t need to be a designer to create Pinterest Pins.
You can take one blog post, turn it into a few useful Pin designs, and send each Pin back to the same article.
Learning how to create Pinterest Pins for your blog doesn’t have to be complicated.This guide shows you how to create Pinterest Pins for your blog from start to finish, including the design, headline, Pinterest SEO, links, image sizes, Canva workflow, and a simple publishing system you can actually maintain.
Quick answer: Create a vertical 2:3 Pin around one clear idea from your blog post. Use a strong headline, a simple visual, your brand name, and a clear reason to click. Then add a relevant Pin title, description, destination URL, and board. Pinterest currently recommends a 2:3 aspect ratio for standard image creative, with 1000 × 1500 px as a recommended example.
Affiliate disclosure: Some links in this article may be affiliate links. If you purchase through one of those links, SoloBizStack may earn a commission at no extra cost to you.
Why Create Pinterest Pins for Your Blog?
A blog post and a Pinterest Pin do different jobs.
Your article contains the detailed answer.
The Pin is the invitation to discover that answer.
For example, suppose you publish an article called:
How to Build a WordPress Website for Beginners
You could turn that one article into several Pins:
- How to Build a WordPress Website: Beginner Guide
- 10 Steps to Start a WordPress Website
- WordPress Website Checklist for Beginners
- What You Need Before Building a WordPress Website
- Beginner WordPress Setup Guide
Each Pin can focus on a slightly different angle while linking back to the same useful article.
Pinterest also lets you add a URL to a Pin, giving people a direct path from Pinterest to your website. With a business account, Pinterest provides analytics and scheduling features, and you can also create Rich Pins for eligible websites.
That makes Pinterest particularly interesting for bloggers.
You’re not only creating social graphics.
You’re creating another entry point to your content.
What Makes a Good Pinterest Pin?
A good Pin doesn’t need to be complicated.
In fact, complicated designs can make the main message harder to understand.
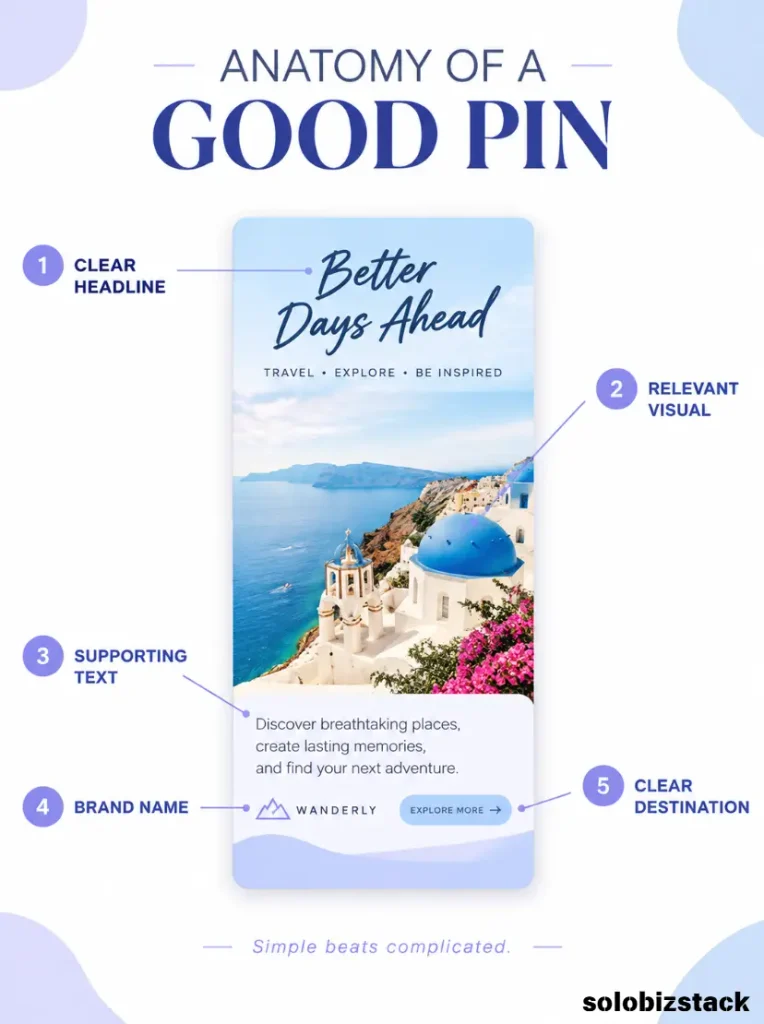
A strong blog Pin usually has five basic parts:
1. One clear headline
The reader should understand the topic quickly.
2. A relevant visual
Use an image that supports the subject rather than distracting from it.
3. A small amount of supporting text
One short benefit, promise, or clarification can help.
4. Brand recognition
Include your site name or logo in a consistent location.
5. A clear destination
The Pin should lead to a page that actually delivers what the Pin promises.
Pinterest recommends a vertical 2:3 layout for standard image creative and advises making your logo or brand name visible without letting it dominate the design.
For a beginner blog, that’s enough.
You don’t need ten text boxes, twenty icons, or a complicated collage.
Pinterest Pin Size: What Should You Use?
Pinterest is built around vertical content.
For standard image creative, Pinterest currently recommends a 2:3 aspect ratio, with 1000 × 1500 px as the recommended example for standard image ads. Larger aspect ratios may be cropped in feeds.
For your blog workflow, I recommend using:
1000 × 1500 px
as your main Canva working size.
Canva also provides a Pinterest portrait reference size of 735 × 1102 px, which follows the same approximate 2:3 ratio.
The exact pixel size matters less than keeping the correct vertical proportion and making sure your text is readable on a phone.
Step 1: Pick the Right Blog Post
Don’t create a Pin for every article just because you can.
Start with posts that have a clear benefit for the reader.
Good candidates include:
- How-to guides
- Checklists
- Tutorials
- Beginner guides
- Recipes
- Templates
- Comparisons
- Step-by-step articles
- Resource lists
For SoloBizStack, this could include:
How to Build a WordPress Website for Beginners
WordPress Website Checklist for Beginners
Best Website Hosting for Beginners
Best AI Writing Tools for Bloggers
Best AI Image Generators for Content Creators
How to Create Blog Images Without a Designer
These topics naturally give you something useful to put on the Pin.
Step 2: Choose One Angle for the Pin
This is where a lot of beginners make their Pins too vague.
Don’t try to explain the entire article in one image.
Choose one angle.
Suppose your article is:
How to Create Blog Images Without a Designer
One Pin could say:
Create Blog Images Without a Designer
Another:
5 Blog Image Tips for Beginners
Another:
How to Make Blog Graphics in Canva
Another:
Blog Image Checklist
Same article.
Different entry points.
The goal is not to make four copies of the same graphic.
Give each Pin a reason to exist.
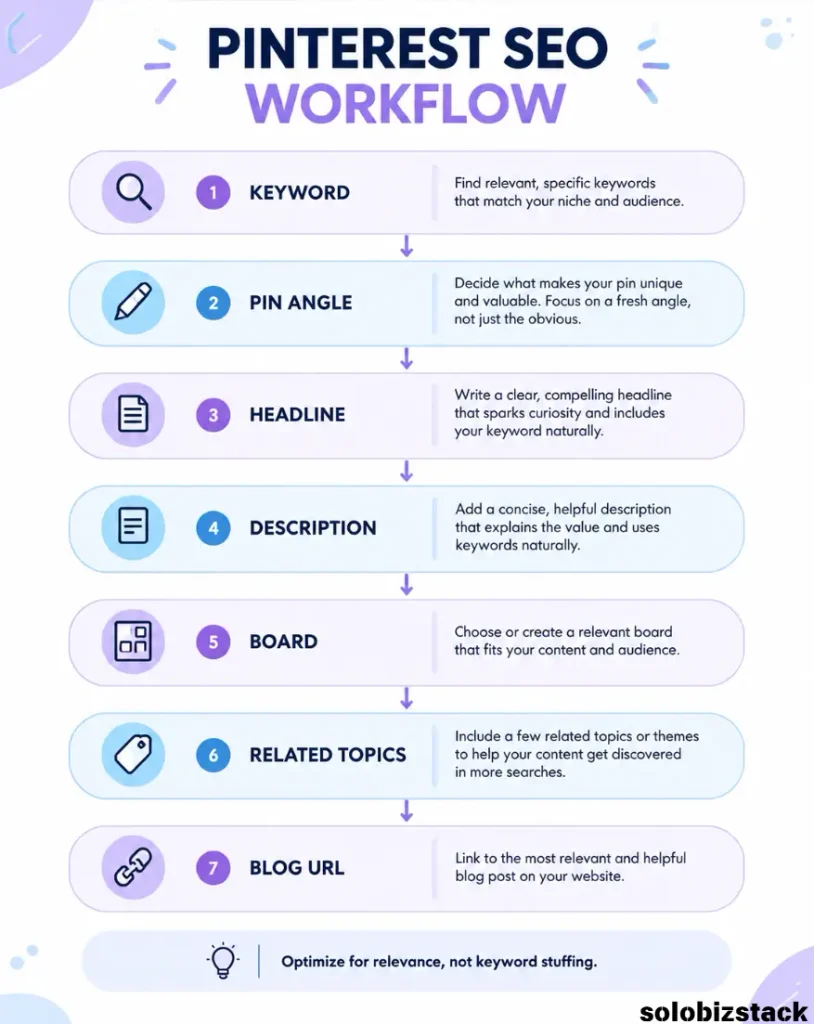
Step 3: Research Pinterest Keywords
Pinterest is not only a visual platform. People also use it to search for ideas, and Pinterest’s current business guidance recommends using relevant keywords in Pin titles and descriptions. It also recommends filling in available Pin fields and using related topics when offered.
Start by thinking like the person who would click your Pin.
If your article is about Pinterest Pins, possible search phrases might include:
- Pinterest Pins for blogs
- How to create Pinterest Pins
- Pinterest marketing for bloggers
- Pinterest graphics
- Pinterest design
- Blog promotion on Pinterest
- Pinterest SEO
- Canva Pinterest Pins
Don’t stuff all of these into one Pin.
Pick the phrase that best matches the content.
Pinterest also provides Pinterest Trends, which can help you discover search terms and emerging trends relevant to your audience.
A useful approach is:
Main keyword → related phrases → Pin angle
Then create your headline around the actual problem you’re solving.
Step 4: Write a Pin Headline People Can Understand Quickly
Your headline is one of the most important parts of the graphic.
Compare:
Blogging Tips
with:
7 Easy Pinterest Tips for New Bloggers
The second tells the reader much more.
Good Pinterest headlines usually answer one of these questions:
What is this?
How will it help me?
What will I learn?
What problem does it solve?
Examples:
How to Start a WordPress Website
7 Easy Pinterest Tips for Bloggers
Blog Image Checklist for Beginners
How to Create Pinterest Pins in Canva
10 Website Launch Mistakes to Avoid
Avoid making the headline so long that it becomes a paragraph.
The Pin should be understood at a glance.
Step 5: Create the Visual
You don’t need a complicated illustration.
For many blog Pins, start with one strong image.
This could be:
- A realistic workspace
- A website screenshot
- A product image
- A simple illustration
- A clean infographic
- A before-and-after visual
Then build the headline around it.
For example, a Pin about WordPress hosting could show a laptop with a website dashboard.
A Pin about blog images could show a creator working in Canva.
A checklist Pin could use icons rather than a photograph.
Match the visual to the topic.
Pinterest’s current creative guidance recommends telling a complete story through the visual, with the visual in the middle and supporting text layered above and below. It also recommends keeping branding visible without letting it take over the creative.
Step 6: Create a Simple Canva Template
You don’t want to start from a blank Canva page every time.
Create one master template.
Use:
1000 × 1500 px
Then decide:
- Headline position
- Font
- Brand color
- Logo position
- Image position
- Supporting text style
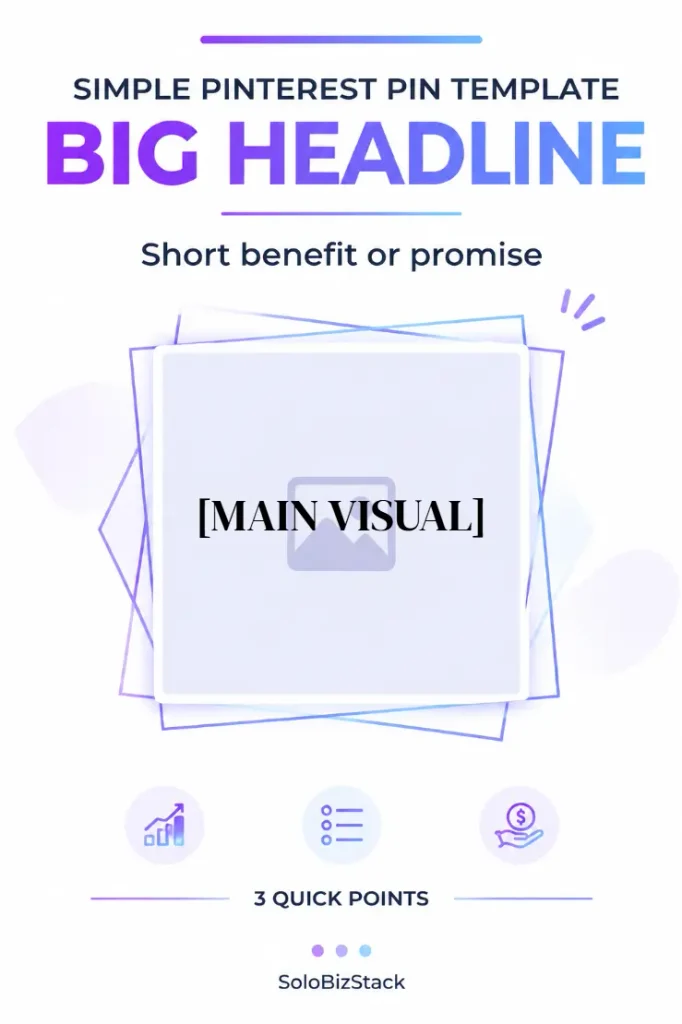
For example:
┌──────────────────────┐
│                      │
│  BIG HEADLINE        │
│                      │
│  Short benefit       │
│                      │
│      MAIN IMAGE      │
│                      │
│  3 quick points      │
│                      │
│      SoloBizStack    │
└──────────────────────┘
Once the layout works, duplicate it.
Don’t redesign the Pin from scratch every time.
Step 7: Use AI to Create the Pin Image
AI can be useful when you need a visual that stock photos don’t provide.
For example:
“Create a realistic editorial image of a solo blogger designing a Pinterest graphic on a laptop, bright minimalist home office, natural lighting, vertical composition, space at the top for headline text.”
Generate the visual without important text when possible.
Then add the headline in Canva.
That gives you more control over:
- Typography
- Line breaks
- Branding
- Spacing
- Contrast
- Future editing
For more AI image ideas, see:
[Best AI Image Generators for Content Creators →]
Step 8: Keep the Pin Easy to Read
Remember that most people are not looking at your Pin on a giant desktop monitor.
Design for the small screen.
That means:
- Large headline
- High contrast
- Short supporting text
- Plenty of empty space
- One obvious focal point
Pinterest’s creative guidance specifically emphasizes vertical creative and recommends stacking the visual and text so the story remains clear.
Don’t shrink a long paragraph until it fits.
Delete the paragraph.
Your article is where the details belong.
The Pin should create enough interest for the right person to click.
Step 9: Add Your Brand
Your logo or website name should be visible.
But keep it subtle.
For SoloBizStack, you could place:
SoloBizStack
at the bottom of every Pin.
You can also use a small consistent brand mark.
The goal is to make your Pins recognizable when people see several of them in a feed—not to make the logo larger than the headline.
Pinterest specifically recommends keeping your logo or brand name visible while avoiding a design where branding overwhelms the creative.
Step 10: Create the Pin Title
Your Pin image has its own headline.
Pinterest also gives you a separate title field when you create the Pin. Its current creation workflow also includes fields for description, link, board, and related topics.
Don’t simply copy random keywords into the title.
Make it readable.
For example:
Pin image headline:
How to Create Pinterest Pins for Your Blog
Pin title:
How to Create Pinterest Pins for Your Blog: Beginner Guide
The two can be similar, but they don’t need to be identical.
Step 11: Write the Pin Description
Your description gives Pinterest and the reader more context.
A simple structure is:
What the content is about
Who it helps
What they’ll learn
Optional call to action
For example:
Learn how to create Pinterest Pins for your blog with a simple Canva workflow. This beginner-friendly guide covers Pin sizes, headlines, Pinterest SEO, design templates, and how to link Pins back to your blog.
That’s much better than:
Pinterest tips!!! #Pinterest #blogging #Canva
Pinterest’s business guidance recommends adding relevant keywords to titles and descriptions and completing the available Pin fields.
Step 12: Always Add the Correct Blog URL
The Pin should take readers to the page that actually delivers what the Pin promises.
If your Pin says:
How to Create Pinterest Pins for Your Blog
the link should go to the article about creating Pinterest Pins.
Not your homepage.
Not your Pinterest profile.
Not an unrelated affiliate landing page.
Pinterest explicitly provides a link field when creating Pins, and its business guidance recommends adding a URL so Pins can drive traffic back to your site.
This is one of the simplest ways to make Pinterest part of your blog traffic strategy.
Step 13: Choose the Right Board
Your board title should be clear.
Instead of:
My Stuff
use something descriptive:
Blogging Tips
Pinterest Marketing for Bloggers
WordPress Tips
AI Tools for Content Creators
Online Business Tools
Board descriptions matter too. Pinterest advises giving boards clear, descriptive titles and descriptions because people can discover boards through search.
Think of your boards as categories.
Someone should be able to understand what belongs there without opening the board.
Step 14: Use Related Topics When Pinterest Offers Them
Pinterest’s current creation workflow can allow creators to tag related topics, with up to 10 topics available in the interface.
Don’t add unrelated topics just because you can.
Choose topics that genuinely describe the Pin.
For a Pin about WordPress:
Good:
- WordPress
- Blogging
- Website Design
- Small Business
Not:
- Recipes
- Home Decor
- Fashion
Relevance matters more than filling every available field with random words.
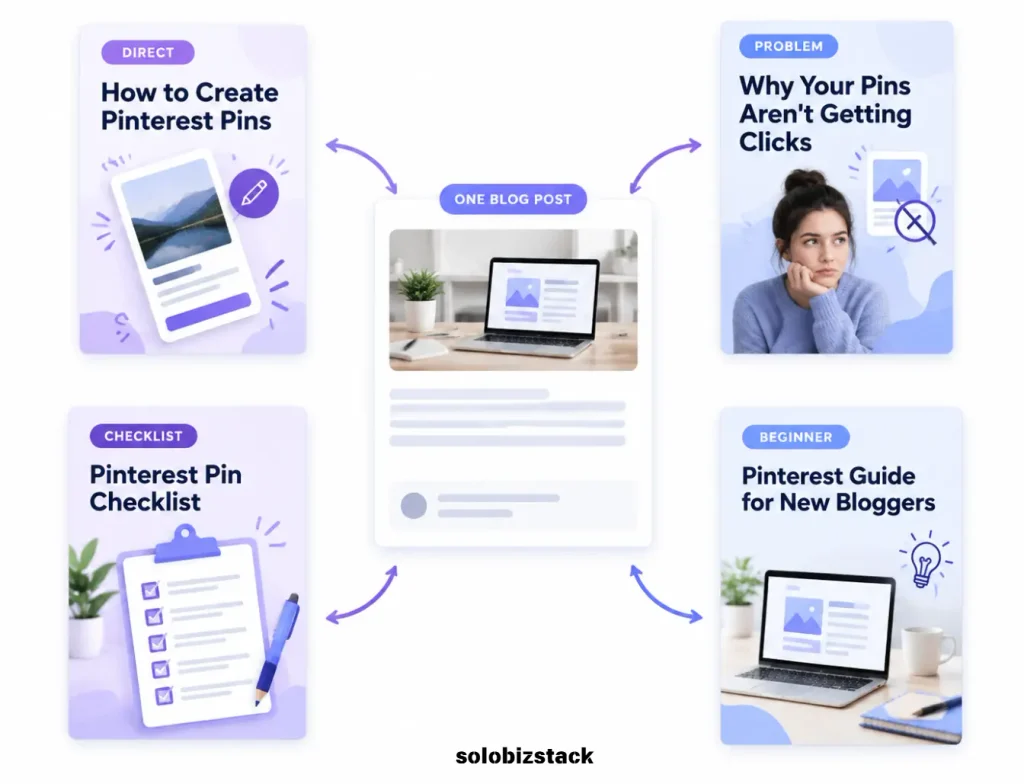
Step 15: Create Multiple Pins From One Blog Post
This is where Pinterest becomes much more useful for bloggers.
One article can support several Pins.
For example:
Article
WordPress Website Checklist for Beginners
Pin 1
WordPress Website Checklist
Pin 2
15 Things to Check Before Launching Your Website
Pin 3
Beginner WordPress Launch Guide
Pin 4
Don’t Launch Your Website Until You Check These
Each Pin can link to the same article.
You are not creating four articles.
You’re creating four different entry points to one useful resource.
Pinterest itself encourages creators to create new original Pins regularly and provides tools for scheduling Pins.
The important part is to make each Pin genuinely useful and visually distinct rather than producing large batches of near-identical graphics.
Step 16: Add Pinterest Pins to Your Content Workflow
Don’t treat Pinterest as something you remember to do three weeks after publishing an article.
Add it to your publishing checklist.
For every new article:
Write article
↓
Create featured image
↓
Create 2–4 Pin concepts
↓
Design Pins
↓
Add title + description
↓
Add article URL
↓
Choose board
↓
Publish or schedule
This is much easier to maintain.
And it means your Pinterest activity grows automatically as your content library grows.
Step 17: Use Pinterest Trends for New Content Ideas
Pinterest Trends can be useful before you even write the article.
Pinterest’s current business materials describe Pinterest Trends as a tool for finding trending keywords and understanding what’s inspiring audiences. Pinterest Predicts can also provide emerging trend ideas and associated search terms.
For example, instead of starting with:
“What should I write about this month?”
you can start with:
“What topics around online business, blogging, WordPress, or content creation are people actively exploring?”
Then combine that with your own expertise and site strategy.
Don’t chase every trend.
Use trends to find ideas that fit your audience.
Step 18: Track What Happens
Creating Pins is only half the job.
Look at what happens afterward.
For each Pin, pay attention to things such as:
- Impressions
- Saves
- Outbound clicks
- Engagement
- Which designs receive attention
- Which topics generate clicks
Pinterest business accounts provide analytics tools for monitoring Pin performance.
You don’t need to obsess over the numbers every day.
Once or twice a month is enough for a small blog.
Ask:
Which topics get attention?
Which headlines get clicks?
Which designs get saved?
Which articles actually receive traffic?
Then make more of what works.
Common Pinterest Mistakes Bloggers Make
Mistake 1: Making the Pin too complicated
One Pin should communicate one main idea.
Mistake 2: Using tiny text
Design for mobile first.
Mistake 3: No clear destination
Always make it obvious where the Pin goes.
Mistake 4: Using the same Pin for every article
Create a visual identity, but don’t make every Pin identical.
Mistake 5: Keyword stuffing
Use relevant words naturally in your title and description instead of turning them into a list of search terms.
Pinterest itself recommends relevant keywords and descriptive information rather than incomplete or vague Pin setup.
Mistake 6: Sending every Pin to the homepage
Send readers to the specific article that matches the Pin.
Mistake 7: Designing first and thinking about the headline later
Start with the message.
Then choose the visual.
Mistake 8: Publishing and never checking performance
A simple monthly review can tell you a lot.
A Simple Pinterest Workflow for Solo Bloggers
If you’re running your site alone, you don’t need a complicated Pinterest operation.
Try this:
Every new blog post
Create:
1 featured image
3 Pinterest Pin variations
Then create:
1 board/topic match
And add:
1 destination URL
Your three Pins could be:
Pin A — Direct
How to Create Pinterest Pins for Your Blog
Pin B — Problem
Why Your Blog Pins Aren’t Getting Clicks
Pin C — Checklist
Pinterest Pin Checklist for Bloggers
This is enough to get started.
As your content library grows, you can add more variations to your best-performing articles.
The Easiest Canva Template for Pinterest
Here’s a simple layout you can recreate:
┌──────────────────────┐
│                      │
│   BIG HEADLINE       │
│                      │
│   Small supporting   │
│   sentence           │
│                      │
│      MAIN IMAGE      │
│                      │
│   ✓ Point 1          │
│   ✓ Point 2          │
│   ✓ Point 3          │
│                      │
│      SoloBizStack    │
└──────────────────────┘
Keep your headline to roughly one idea.
Keep the supporting sentence short.
Make the image the visual focus.
Put your brand name in the same place every time.
Once that template works, duplicate it rather than redesigning each Pin.
Canva is particularly convenient for this because you can build the graphic, duplicate the design, resize or adapt it, and keep your branding consistent. Canva also provides Pinterest-specific templates and sizing references.
How to Create a Pin in 10 Minutes
Once you have a template, the workflow can be surprisingly fast.
Minute 1
Choose one article.
Minute 2
Choose one keyword and one Pin angle.
Minutes 3–5
Create or select the visual.
Minutes 6–7
Add your headline and branding.
Minute 8
Export the image.
Minute 9
Add the Pin title, description, board, and URL.
Minute 10
Publish or schedule it.
You don’t need to spend an hour designing every Pin.
The real time saver is the template.
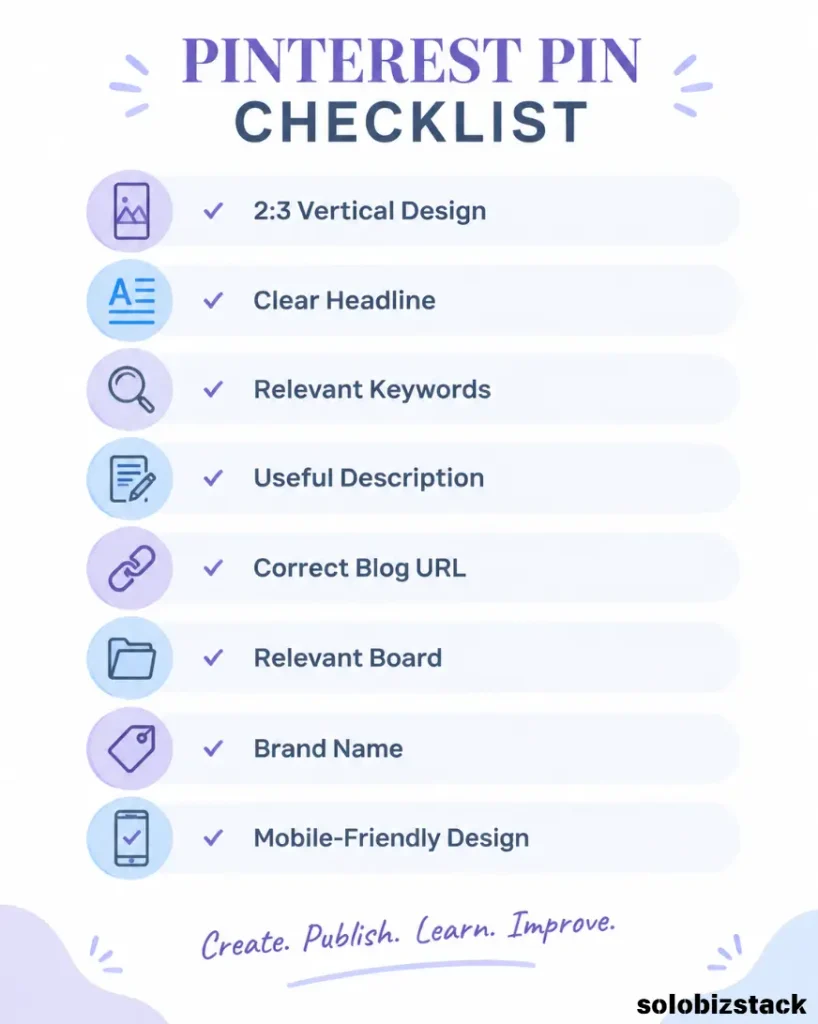
Final Pinterest Pin Checklist
Before you publish, check:
Design
- 2:3 vertical format
- Headline is easy to read
- Main image is relevant
- Brand name is visible
- Design isn’t overcrowded
Pinterest SEO
- Pin title describes the content
- Description includes relevant keywords naturally
- Related topics are relevant
- Board name is descriptive
Traffic
- Correct blog URL is attached
- Destination page matches the Pin promise
- Link works on mobile
Content
- The Pin offers a clear reason to click
- The article provides what the Pin promises
- The design is meaningfully different from your other Pins
Tracking
- Pin performance can be reviewed
- You know which articles the Pin is promoting
- You plan to review results later
Frequently Asked Questions
How many Pinterest Pins should I create for one blog post?
There isn’t a fixed number you need for every article. For a beginner blog, creating 2–4 distinct Pin designs for an important article is a practical starting point. Focus on different angles instead of making near-identical copies.
What size should a Pinterest Pin be?
A 2:3 vertical format is the safest starting point for standard Pinterest image creative. Pinterest currently gives 1000 × 1500 px as its recommended example for standard image ads. Canva also lists a 735 × 1102 px portrait Pin reference, which follows the same ratio.
Should every Pinterest Pin link to a blog post?
No. But for a blog-focused Pinterest strategy, linking a relevant Pin to the specific article it promotes is usually the most useful approach. Pinterest provides a link field when creating Pins.
Do Pinterest Pins need keywords?
Relevant keywords can help Pinterest understand what your Pin is about. Pinterest’s current business guidance recommends using relevant keywords in titles and descriptions and completing available fields.
Can I create Pinterest Pins in Canva?
Yes. Canva provides Pinterest-specific templates and supports vertical Pin designs. Its size guide currently lists 735 × 1102 px as a portrait Pin reference, while Pinterest’s business guidance recommends a 2:3 ratio for standard image creative.
Do I need a Pinterest business account for blogging?
You can create Pins without one, but a business account gives you access to features such as analytics and scheduling. Pinterest’s current help guidance also notes that websites can use Rich Pins when eligible.
Should I put lots of text on my Pin?
Usually not. The Pin should communicate the main idea quickly. Your article can provide the detailed explanation.
Can I use AI-generated images for Pinterest Pins?
Yes, provided the image and its usage comply with the relevant tool’s terms and any applicable copyright or platform rules. AI can be useful for creating original visuals, while Canva can handle the final layout and typography.
Can one Pin send traffic to an affiliate page?
Pinterest Pins can include links, but make sure the destination and affiliate relationship comply with Pinterest’s current policies, the affiliate program’s terms, and applicable disclosure requirements. For a blog like SoloBizStack, sending the Pin to a useful article first is often a more natural content experience.
Final Thoughts
You don’t need a large Pinterest operation to start getting value from the platform.
You need a useful blog, a clear visual style, and a repeatable Pin workflow.
Start with one article.
Create two or three genuinely different Pins.
Give each one a clear headline.
Use the right keywords.
Link it to the article.
Put it on the right board.
Then look at what people actually respond to.
Over time, you’ll learn which topics, headlines, and visual styles work best for your audience.
That’s the part worth building.
Not a giant collection of Pins.
A simple content system that turns every good blog post into more opportunities to be discovered.
[Read How to Create Blog Images Without a Designer →]
[Read Best AI Image Generators for Content Creators →]
[Read Best AI Writing Tools for Bloggers →]
[Explore SoloBizStack Tools →]
Pinterest features, specifications, and platform policies can change. Review the current Pinterest help and business documentation before changing your publishing workflow.